I’m feeling colourful so I’m sharing how I made my Powertex rainbow fairy houses. I created a whole village of multicoloured magical homes for the garden.

The secret to these coloured fairy houses is mixing my own Powertex colours. I’ve written an article on mixing Powertex colours which could help you if you’re new to this.
Make rainbow fairy houses with Powertex
Supplies I used
- Glass bottles
- Strips of cotton fabrics 1-2″ wide and up to 18″ long
- Kitchen foil
- Masking tape
- Embellishments of your choice such as lace trim, string, buttons, wooden shapes etc
- Powertex Universal Medium in Red, Yellow Ochre, Blue and White or Ivory
- A plate, palette or plastic containers to mix colours
- Plastic palette knife
- Gloves and apron optional
Create a rainbow fairy house

Prepare your bottles
Clean and dry the bottles before you start although you can leave labels on. If the bottles have no labels, use pieces of masking tape to help your fabric stick to the bottles.
If you need to add extra shape or create a roof for your bottle, use kitchen foil to create the shape you want. Cover all the foil and hold it in place with masking or paper tape.
Prepare plenty of fabric strips, pieces and embellishments before you start the next step.
Choose your colours
I chose my colours before I started so I was ready, although I mixed the colours as I went. Powertex has a working time of about an hour but starts to cure immediately it’s exposed to air.
I started with red, then mixed orange, yellow, green and blue and them purple at the end.
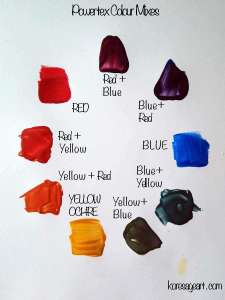
Red + Yellow Ochre = Orange
Red + Blue = Purple
Yellow Ochre + Blue = Green
Use different amounts of your colours to get different shades. Use with white to create pastel shades or black for darker.
Wrap your bottle
Each strip was coated with Powertex fabric hardener but not saturated. It doesn’t need to be overly wet. I started at the top with red. Just wrap your coated fabric in spirals around the shape. Overlap them a little to get good adhesion and a nice stripy effect.
Add some yellow to the plate to mix an orange and use that for the next fabric pieces. A few strips of this, then move to the yellow. I added blue Powertex to my plate and mixed a little green. A few strips of green, then blue. Lastly mixing a little blue and red for the last purple strips.
Embellishments can be any colour you like, I chose to mix in some white to my colours for pastel pieces for doors and details. Use Powertex to glue on any details and leave the whole thing to dry.
You might choose to work on more than one fairy house at a time so you’re just mixing the colours once.
Dry brushing
The bottles are left to dry before doing any dry brushing. The dry brushing is more about adding some shimmer and shine to those colours with Pearl pigments. I mix the Pearl powder pigment with Easy Varnish to create a weatherproof paint and brush this over the house and embellishments.

Other ideas
Of course you could choose to limit your colours more or add extra coloured paint at the end. There are no rules here, just have fun. Working with just two colours and mixing them or even just one colour mixed with Ivory and also Black will create a brilliant striped effect. Or how about a black and white stripes?
If you’d like to know more about Powertex products you might find this article helpful. I get all my supplies from Powertex UK.


2 Comments
5 Powertex projects for beginners - Blog - Kore Sage Art · 8th September 2019 at 7:29 pm
[…] Get some tips on making fairy houses. […]
Mixing colours with Powertex - Blog - Kore Sage Art · 22nd August 2021 at 5:54 pm
[…] have made rainbow fairy houses but you might just need a luxurious purple for your latest make. Imagine how your canvas art can be […]
Comments are closed.