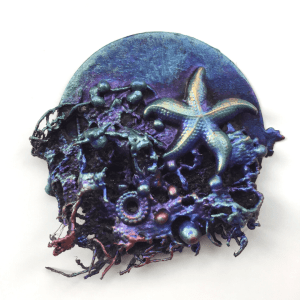
Get back into creating with mini mixed media art
In my last blog I shared about my struggle to get back into making art after a break. There are lots of things to try and kick start your creative mojo. These include limiting my supplies, trying an online challenge or course and just starting small with some mini mixed media Powertex art!

A few days later I began to see my Instagram feed filled with daily art from the 100 day project. Many of these pieces were small, quick to create and experimental rather than finished pieces. Seeing these along with thoughts of starting small, finally gave me the spark I needed to get going. I gathered up some ideas to keep it simple, here’s what I did.

Set boundaries and limitations
Setting boundaries can be really helpful when creating something new so I decided to make 10 tiny art pieces with a small selection of supplies. Having too many choices can be paralysing so this helps to stop me getting frozen by indecision.
Set up a theme, colour supplies or materials to help with this. You might need to let go of your expectations a bit here. Just grab some materials without too much thought, use what’s already on your art table or what’s within easy reach. The key is not to get stuck again because you can’t decide what to choose!
I gave myself a target of making 10 tiny pieces in a few days. This meant I could switch between them, allow some to dry while working on others and if something was really not good, I could focus on the other pieces and keep going. Maybe working like this could help you to keep going too.
Tips for making small art
Preparation!
This one is really not for everyone and I’m usually pretty intuitive when I’m creating so this is not how I work normally. I wanted to avoid getting stuck with trying to choose colours or looking for something specific. This meant getting things ready before I started. This can be useful with Powertex anyway unless you want your sticky mitts in your craft stash half way through!

Materials
- Black Powertex Universal Medium
- 2″ circles and squares of heavy watercolour paper or card
- Tiny scraps of fabric and threads
- Small embellishments in metal, wood and resin I grabbed about 20 to choose from
- 3D Sand and balls
- Powder pigments and Easy Varnish
- A non stick mat, paper plate and paintbrush
It was useful for me to choose a handful of tiny pieces to include. I grabbed embellishments, threads and fabric scraps based on their size rather than their theme, texture or colour. My supplies were from Powertex UK.
Make tiny Powertex mixed media art
I laid out my 2″ watercolour paper circles and coated them with Black Powertex to stiffen them. Then put my scraps, embellishments and 3D sand and balls on my table ready.
- Coat both sides of the paper to stop it curling too much.
- Start with fabric pieces and coat with Powertex and scrunch and press them with your fingers.
I scrunched up a couple of fabric pieces per circle and let the Powertex glue them to the card.
- Sprinkle on some 3d Sand or Small balls for tiny textures.
These are optional but they look so great on these small pieces. You could also include cotton threads, tiny buttons, dried seeds or other tiny textures.
- Add a metal or resin embellishment as a focal point by coating completely and then glueing into place with extra Powertex.
- Leave to dry.
- Highlight the textures with powder pigments mixed with Easy Varnish.
I kept my colours limited to pearl Violet, Blue, Lime and Berry. (I admit I snuck in a bit of Copper once I got into the swing of it!)
Layering up the colours is really just the best part for me. I usually start with the darker colours first then add tiny highlights with the lighter colours. They cover really well so it’s easy to go back and paint over something if it’s not looking good.

I made 10 pieces and while 3 of them didn’t really work out well I was pretty pleased with the others. I really loved the Violet/Blue/Green combination. Use your mini mixed media art to make fridge magnets, card decorations or even to add a bigger project later.


