Hand-making Christmas decorations, like Powertex wreaths, is popular for a reason. We get to make things and have a use for our creations. We can bring them out year after year and pass them on to family.
I created a Powertex Christmas wreath for the Powertex UK design team using the Winter Secret Art Box which had a red and gold theme, so I layered up the sparkle for a rose gold finish. It can even be used outdoors when cured, perfect for your front door.
Make your own Powertex Christmas wreath
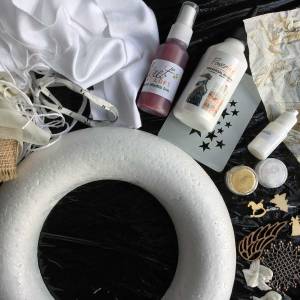
Materials, for this project I used:
- Polystyrene ring
- Ivory Powertex Universal Medium
- Rice or tissue paper
- Fabric strips, string, t-shirt yarn
- Christmas themed embellishments in wood, metal, resin or plaster
- Lava acrylic ink spray from Powertex UK
- Powder pigments (Colortricx in Pearl, Clear Gold and Rich Gold)
- Easy Varnish
- Optional star stencil and Easy Structure texture paste
Using a polystyrene base makes it easy to get started but you could also use an mdf or chipboard ring or even harden fabric into the size you want with Powertex Universal Medium.
How to build your Powertex layers
Use shallow textures first on your base and then bigger textures later. My basic layers are as follows:
- Ivory Powertex Universal Medium, painted over the polystyrene
- Ripped paper strips onto wet Powertex in some areas
- Fabric strips coated with Ivory Powertex, wrapped around the rest
- Pieces of string and t-shirt yarn coated with Ivory Powertex to add texture
- Stencil textured stars with Easy Structure in flat areas
- Embellishments coated and glued into place with Ivory Powertex for a focal point
Notice how the Powertex medium is a primer, paint, fabric hardener and glue. This stage was left to dry thoroughly before adding colour.
Using colour with Powertex
Lava acrylic ink spray was included in the subscription box, spray this generously over the whole wreath.
The ink runs into the textures and can be blended with other colour inks. I tried an Aqua ink on the edges to add depth but this was way too dark. When it was dry I repeated the Ivory Powertex and Lava ink on the sides to correct this.

Using Powder pigments
When dry, mix powder pigments to paint over the top of this. Use a little Easy Varnish on a craft mat and mix small amounts of powder pigment into it with flat brush.
On this project I painted the whole piece with the Pearl pigment for lots of sparkle. Then build up the Clear Gold and Rich Gold slowly with a dry brushing technique, until the whole piece is shimmering!

Add a hook
Add a hook to the back of the wreath with Powertex fabric hardener and a small strip of fabric folded and pressed into place. When dry this will be strong enough to hang your decoration.
A weatherproof decoration when cured
This lovely Christmas Powertex project is simple for beginners and is fun with the kids in the run up to Christmas. Remember, the Powertex medium is weatherproof but needs three weeks to cure before going outside. Give yourself extra time for this if it’s for your front door.

Create seasonal craft projects to help you make beautiful home decor all year round. If you like a Christmas project, you might like these Powertex Stone Art star decorations.
[Updated February 2024]

